Coil Building 101: A Beginner's Guide
- Posted on
- 0
Coil building is key to making your vaping experience just the way you like it.
First, pick the type of wire you want to use—Kanthal, Nichrome, or Stainless Steel. Cut a piece of wire about 5-7 inches long.
Next, grab a coil jig and wrap your wire around it to shape your coil.
It's really important to check your coil's resistance with an ohm meter; you should aim for between 0.5 and 2.5 ohms to stay safe.
Once you've got that, attach the coil to your atomizer and tweak it with ceramic tweezers to make sure it's evenly spaced.
Use organic cotton for the wick so it soaks up the e-liquid well.
Before you start vaping, always test your setup to make sure everything's working right.
Once you get good at these steps, you'll see a big boost in flavor and vapor!
Key Takeaways
- Understand different wire types like Kanthal and Nichrome to choose the best for your vaping preference.
- Learn to measure and cut the wire correctly, typically 5-7 inches, for desired coil resistance.
- Use a coil jig or metal rod for wrapping the wire into coils, ensuring even spacing with ceramic tweezers.
- Always check coil resistance with an ohm meter to maintain safety and optimal performance.
- Master proper wicking techniques using organic cotton to enhance flavor and vapor production.
Understanding Coil Building
Coil building is all about making the spiral parts that go into electronics, and it's super important to get it right. When you start building coils, especially for vape devices, you'll see how fun and interesting it can be. These coils are crucial because they heat up the liquid that turns into vapor.
Let's talk about the coil heads – they're the main part of the coil that heats up the liquid. It's really important to know how the resistance of your coil affects your device.
If your coil has lower resistance, it will make more vapor and flavor but will also use more power. On the other hand, if your coil has higher resistance, it will use less power, which means your battery will last longer and the vape will be cooler.
Essential Tools and Materials
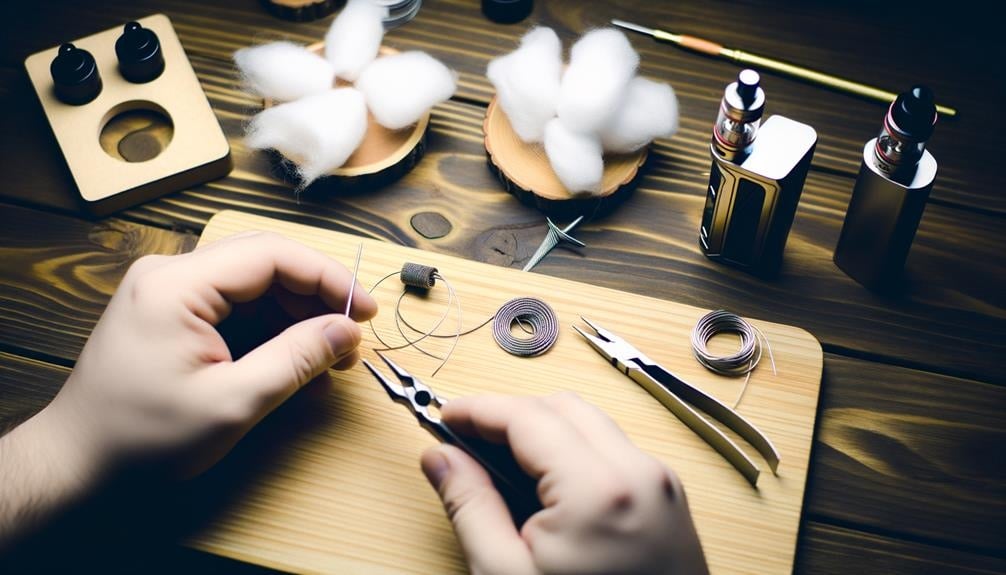
Building your own coils can be really fun and rewarding! Here's a list of the tools and materials you'll need to get started the right way:
1. Coil Jig - This tool helps you make your coils perfectly round and the right size every time.
2. Wire Cutters - You'll use these to trim off extra wire. It makes your coils neat and stops you from wasting wire.
3. Ceramic Tweezers - These are great for adjusting your coils even when they're hot, without the risk of shorting them out like metal tweezers might.
4. Ohm Meter - This is a must-have because it checks if your coils are safe to use by measuring their resistance.
5. Wire - You can pick between different types like Kanthal, stainless steel, or nickel. Each type makes your coils work a bit differently.
6. Organic Cotton - This absorbs your e-liquid and feeds it to the coils. It helps everything vape smoothly.
With these tools and materials, you'll be ready to build awesome coils!
Coil Types and Resistance
Now that you have all the basic tools and materials, let's dive into the different coil types and how resistance makes a difference in your vaping.
There are several types of coils like Kanthal, Nichrome, Stainless Steel, Nickel, and Titanium. Each type changes how fast your vape heats up and how your vape tastes.
Resistance is measured in ohms and it's really important for your vaping experience.
If you want big clouds of vapor, go for coils with low resistance, which is less than 1.0 ohm. These coils heat up quickly and use more power.
But if you prefer using less e-liquid and enjoying the flavor more, choose high-resistance coils, which are more than 1.0 ohm. These give you a cooler vape and better flavor.
There are also micro coils and macro coils. Micro coils are smaller and have higher resistance, which is great if you love a good flavor.
Macro coils are bigger, over 2.5 mm in diameter, and have lower resistance, perfect for those who love chasing clouds.
Choosing the right coil type and resistance depends on what you enjoy more: huge clouds or delicious flavors. Think about what matters most to you because it will really affect your vaping.
Step-by-Step Coil Construction
Building the perfect coil for your vape is an essential step to ensure you get consistent vapor and excellent flavor. Here's a step-by-step guide to help you construct your coil correctly:
1. Measure and Cut the Wire: Start by measuring and cutting a piece of wire that is between 5 to 7 inches long. The length you choose should be based on the size and resistance you want for your coil. This initial step is crucial as it sets the foundation for your vaping experience.
2. Wrap the Wire: Take the cut wire and wrap it around a coil jig or a small metal rod. This tool will help you achieve the correct coil shape, which is important for even heating. Ensure you leave a little extra wire at the top; this excess will be used later to connect the coil to the atomizer.
3. Adjust the Coil with Ceramic Tweezers: With ceramic tweezers in hand, gently adjust your coil. You want to make sure the wraps are evenly spaced, as this contributes to consistent vapor production and flavor quality. Also, straighten any twists or kinks in the wire that might impair the coil's function.
4. Check the Resistance: Using an ohm meter, check the resistance of your coil. This is a critical safety step to ensure that the coil's resistance is within a safe operating range for your vape, ideally between 0.5 and 2.5 ohms.
By following these steps, you can ensure that your DIY coil is both effective and safe, enhancing your vaping experience.
Safety Precautions and Tips
Understanding Ohm's Law is very important when you're making coils for vaping. It helps you make sure that the voltage, current, and resistance work well together. This keeps you safe from overheating and other dangers.
Always use an ohm meter to check the resistance of your coil. This is a must-do for your safety and to make sure your build works right.
When you set up your workspace, keep it clean and airy. Avoid wearing loose clothes or jewelry that could get caught in your tools. This might seem like a small thing, but it really helps keep you safe.
Always test your coil in a safe place before you start vaping. This lets you find any problems like shorts or hotspots early on. Making a great coil isn't just about it working well; it's also about vaping safely and having fun each time. Paying close attention to these details not only keeps you safe but also helps you get better at building coils.
Troubleshooting Common Issues
When you're building coils for vaping, it's important to make sure everything is set up correctly to avoid problems. Here is a simple list of steps to follow to ensure your vaping experience is smooth and safe:
1. Check for shorts in the coil: Make sure all connections are secure and that the coil isn't touching any other metal parts of the atomizer.
2. Position the coil properly: Ensure that the coil is properly placed within the atomizer.
3. Adjust your wicking: The wicking material should not be too tight or too loose. A tight wick can block e-liquid flow, causing dry hits, while a loose wick might lead to flooding. Make sure the wick is well-soaked with liquid.
4. Look for hot spots on the coil: Hot spots are parts of the coil that heat up faster than the rest. If you find any, use ceramic tweezers to gently reshape or strum the coil to even out the heat distribution.
5. Use an ohm meter to check coil resistance: Ensure that the resistance level of your coil matches what your device recommends. Adjust the coil's size or material if necessary.
6. Inspect for rust or corrosion: Regularly check the coil for any signs of wear and replace it if you see rust or corrosion to maintain safety and performance.
By following these steps, you can help ensure your vaping device works well and safely.
Enhancing Coil Performance
Picking the right wire type is super important. Kanthal and Nichrome are great choices. Kanthal lasts a long time, and Nichrome heats up quickly, which means you can start vaping faster.
The shape and size of your coil matter a lot too. If you use a coil with a bigger diameter and more wraps, you'll get more vapor. But, if you prefer stronger flavor, go for smaller coils.
Don't forget about proper wicking. Organic cotton is the best because it spreads the e-liquid evenly and keeps those nasty dry hits away. Make sure your wick fits just right—not too tight and not too loose.
Last but not the least, think about your coil's resistance. Lower resistance usually means more clouds, and higher resistance can make the flavor better. Try different resistances to find what works best for your mods and vape kits. This will really make your vaping experience top-notch!
Advanced Coil Building Techniques
To make your vaping even better, it's great to learn some cool coil building tricks! You'll get to work with different kinds of wires like Kanthal, Nichrome, and Stainless steel. Each type of wire changes the taste and how much vapor you get, so you can find what works best for you.
When you try building micro coils, which are really tiny with diameters less than 2mm, you'll see that they make the flavor stronger and use less juice. On the other hand, if you want huge clouds of vapor, go for macro coils. These are bigger, with diameters over 2.5mm.
Using two coils together in a dual coil setup really boosts your vaping. But, you have to be careful to match the resistance and wattage correctly to avoid overheating. This keeps your device running smoothly.
If you're up for a challenge, try making some fancy coils like twisted or woven ones. These not only look cool but also improve how the air flows and how your vape tastes because of their special designs.
Frequently Asked Questions
Is It Cheaper to Build Your Own Coils?
Yes, building your own coils is cheaper. You save money on materials and can make them just how you like. It takes some time, but you'll learn a lot and save money in the long run.
Which Coil Is Best for Beginners?
Kanthal wire coils are great for beginners because they are easy to use and last a long time. They help you learn about different types of coils.
How Do I Build My Own Coils?
To make your own coils, get wire cutters, an ohm reader, and a coil jig. Pick the correct wire and learn how to wind it safely for great results.
What Wattage Should I Start My New Coil At?
Start your new coil at a wattage that fits its resistance. Usually, use about 0.5 to 1 watt for each ohm. Always be safe, check the resistance, and adjust the power to make it taste better.
Conclusion
Keep pushing your boundaries and learning more about coil building! If you have questions or need supplies, visit us at K Town Vape. We're here to help you take your skills to the next level.
Comments
Be the first to comment...